In recent years, additive manufacturing (AM), also known as 3D printing, has transitioned from a niche industry to a truly mainstream technology: a broad range of commercial 3D printers are now available for purchase, from inexpensive do-it-yourself desktop machines to industrial printers that cost millions of dollars. Large-scale additive manufacturing, however, is a relatively new field of research, currently being investigated by only a few laboratories worldwide. The main application of large-scale AM is construction automation: the ability to fabricate building-sized objects rapidly, with little or no manual intervention. Additive manufacturing can also be used to produce highly customized large-scale features, with considerably less effort than that required when using traditional construction techniques.
Large-scale AM is a natural extension of current 3D-printing technology. Here, we use the term large-scale to denote AM systems capable of building objects approximately one cubic metre or larger in volume. The advantages of AM, compared to traditional manufacturing techniques, are well-established. These include the ability to construct parts of almost unlimited 3D geometry, a streamlining of the design-to-construction process, and greater automation during part construction.
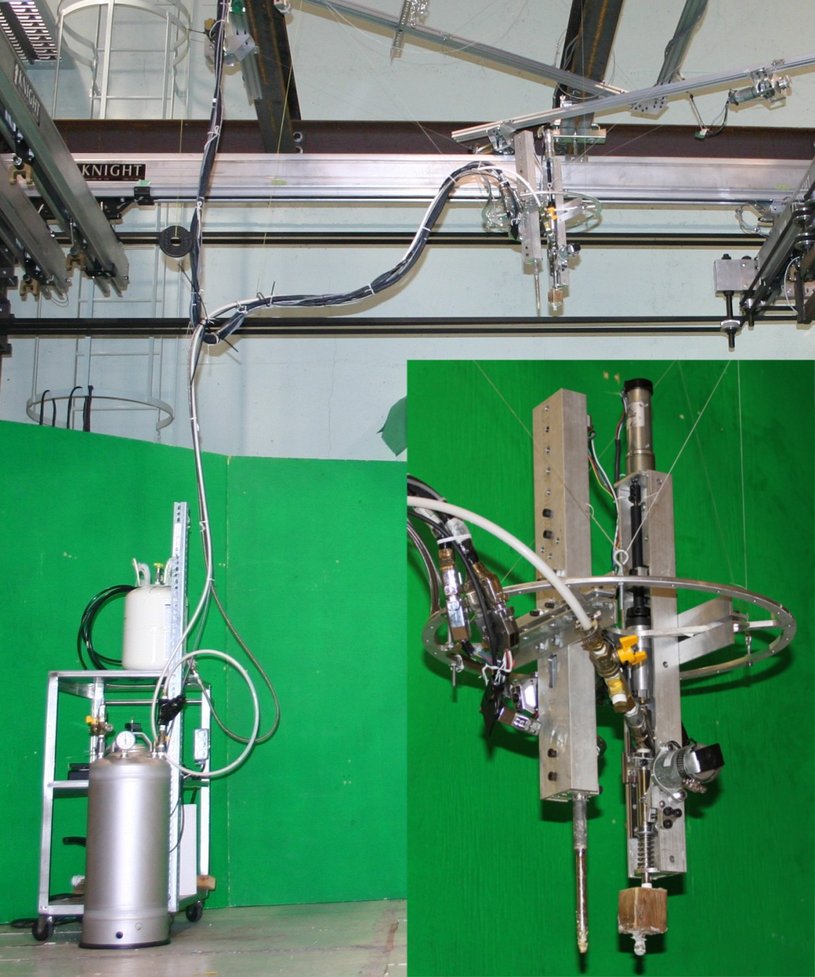
Here, we introduce a large-scale 3D foam printing system, shown in Fig. 2, which uses a six degree-of-freedom (DOF) cable-suspended robot for positioning. Polyurethane foam is used as a proof-of-concept material, since it is light, relatively inexpensive, and can be stored in a ready-to-deposit state for months.
When designing the 3D foam printer, a major decision involved whether or not to install system components on the platform, including power sources, cable actuators, and material supply vessels. With all components on the platform, the system can be moved and installed in a new location much more readily. Additionally, material and power need not be supplied to the platform via a cable bundle, which complicates cable interference problems and exerts a potentially destabilizing force on the platform.
However, with components on the platform, the system will also limited power and material supplies, and the platform will be much heavier. Increasing the actuator power, the power-source energy capacity, or the available material all involve increasing the platform weight. Therefore, this option limits the system performance, especially the energy efficiency. Additionally, manual intervention is required periodically for changing depleted power sources and empty material vessels. This limits the system automation, which is normally one of the strongest motivating factors for using 3D printing, compared to other manufacturing options.
For these reasons, we opted to install power sources, cable actuators, and material supply vessels off the platform. We could therefore minimize the platform weight, use large material supply vessels, and optimize the cable actuators and other system components for performance factors, such as speed, power, and cost. A cable bundle supplies the print materials via tubes, along with power and signal cables for the electronic devices installed on the platform. With this design, the platform, including everything attached to it, weighs approximately 6 kg (13.2 lb).
Positioning
The use of a cable robot for positioning makes the system both highly transportable and reconfigurable. A cable-suspended robot architecture simplifies the problem of cable interference. However, since cable tension is produced using the weight of the platform alone, the achievable robot workspace is limited. An alternative configuration would be a fully-constrained mechanism, which would include cables attached from below as well as from above. This would permit a larger achievable workspace, but cable interference would be a major problem and the mechanism would necessarily be much more complex and less transportable.
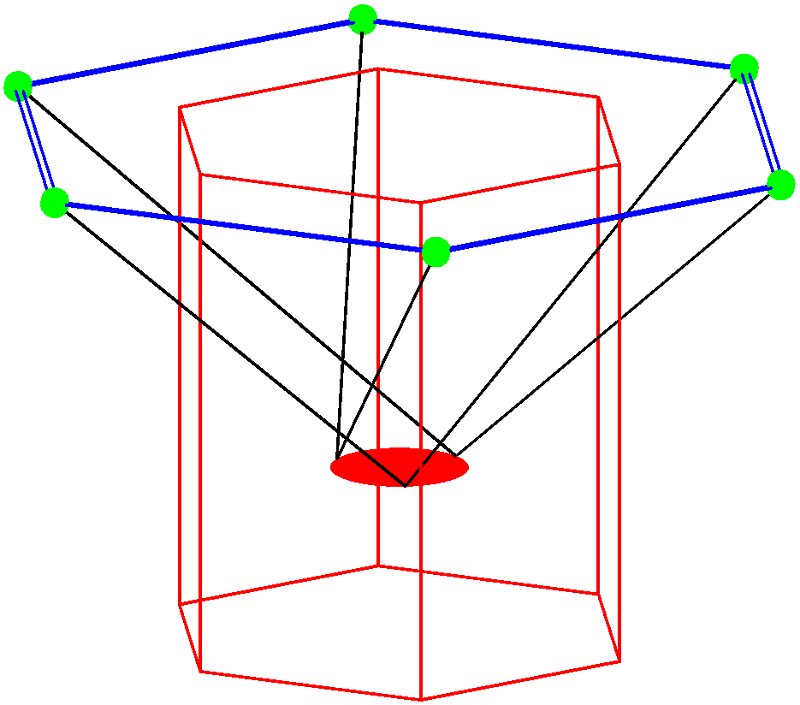
For these reasons, the cable-suspended option was selected, specifically, the six-motor, six-cable configuration shown in Fig. 3. It is important to note that cables starting from actuators located on opposite points on the blue hexagon attach to the same point on the red platform, and each cable passes through a "vee" formed by two other cables. This can be clearly seen by manipulating a 3D PDF file, which can be opened by clicking on the figure. This configuration was chosen based on previous work involving a similar mechanism, which was used to photograph an object from multiple viewpoints. The viewpoint and photographic data were used to build a 3D computer model, including the correct object appearance.
Material Deposition
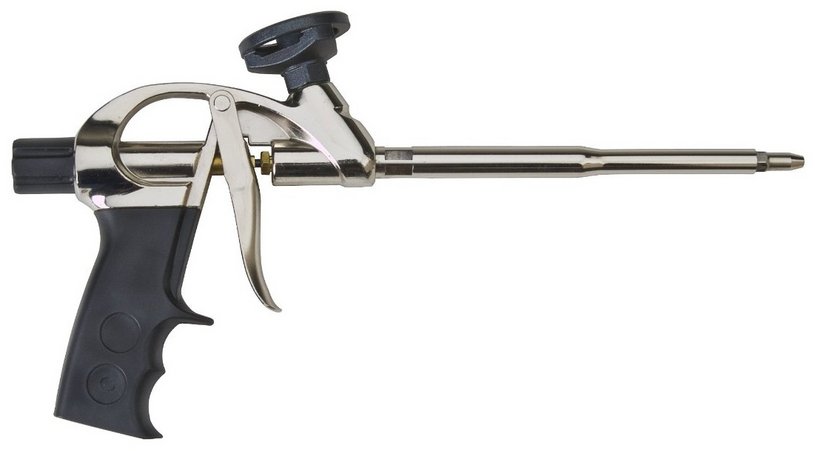
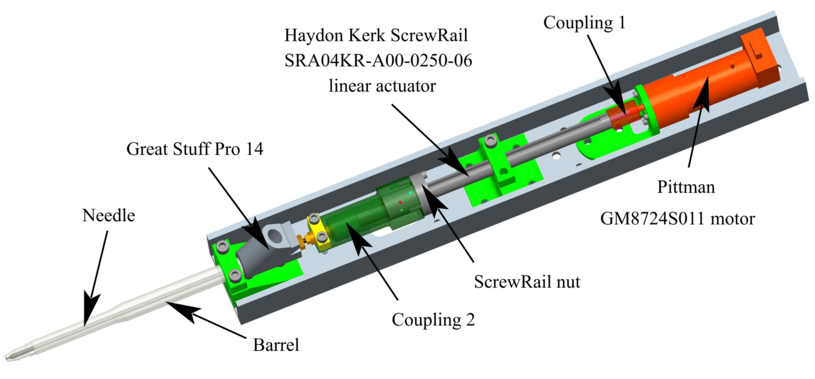
Polyurethane foam was selected as a proof-of-concept material for the cable-suspended 3D foam printer because it is relatively inexpensive, lightweight, and storable in a ready-to-use state. Additionally, it can be purchased off-the-shelf, and precise flowrate control mechanisms exist such as the Great Stuff Pro 14 manual foam deposition gun, shown in Fig. 4, manufactured by The Dow Chemical Company. Foam flow control is achieved with the gun by depressing and releasing the trigger, thereby retracting and advancing a needle within the barrel. This gun can be readily adapted for use with standard 10 lb (4.5 kg) polyurethane foam cylinders, such as that manufactured by Touch 'n Foam, which generate approximately 200 L of foam.
We retrofitted the Great Stuff Pro 14 for automatic control, as shown in Fig. 5. The handle and trigger assembly were removed to gain access to the back end of the needle, shown in orange in the figure. The trigger was replaced by a linear actuator driven by a DC motor. Relatively precise flowrate control can be achieved using this mechanism, and needle positioning is synchronized with platform positioning along deposition paths.
One of the desired properties of the 3D foam printer is the ability to reproduce any 3D geometry. A technique is therefore needed to support part features that would otherwise overhang free space. We decided to fill this space by simply depositing a second material. Shaving foam was selected as the support material because it is lightweight, inexpensive, easily removable, and partially reusable. Following part construction, shaving foam residue is removed from a polyurethane part by simply spraying it with water.
Unfortunately, unlike polyurethane foam, shaving foam does not cure and harden following deposition. If the basic support technique, shown in Fig. 6, is used, the shaving foam would collapse. For this reason, the two alternative techniques shown in Fig. 6 were developed. The shell technique contains the shaving foam by creating an outer shell of polyurethane foam. This method is compatible with any 3D geometry but is also very inefficient in terms of material use. The film technique fills the entire support volume with polyurethane foam, except for a thin film of shaving foam to allow for separation of the part and support following construction. This technique is efficient but is not compatible with all part geometries. However, it can be used most of the time, and it was used for both of the part-construction examples given below.
Measurement and Error Correction
Although the 3D printer is capable of relatively precise positioning and deposition control, accumulation of geometric error is inevitable. Indeed, without some form of geometric error detection and correction, the system can rarely print more than twenty layers of material before either the foam gun collides with the part under construction, or the clearance between the gun tip and the top surface of the part becomes too large.
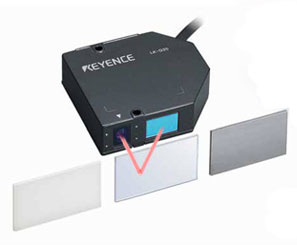
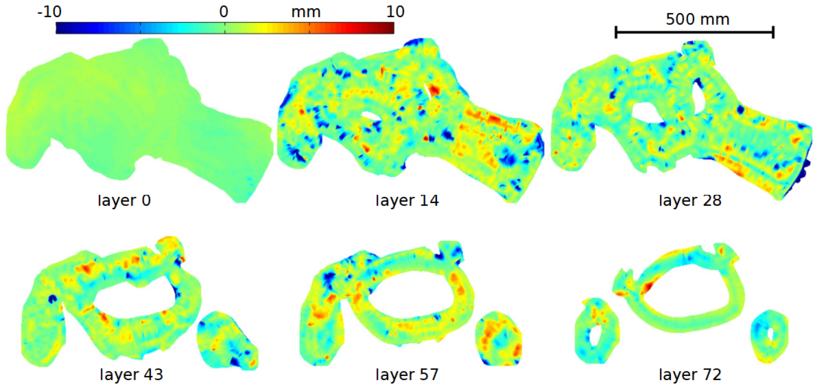
For this reason, a geometric feedback system, called Surface Mapping Feedback (SMF), was implemented, which periodically maps or measures the entire top surface of the part and adjusts subsequent deposition path data to correct geometry errors. Surface mapping is accomplished by following the paths of the previously deposited layer and logging the varying vertical distance indicated by a laser displacement sensor, shown in Fig. 7, mounted to the platform.
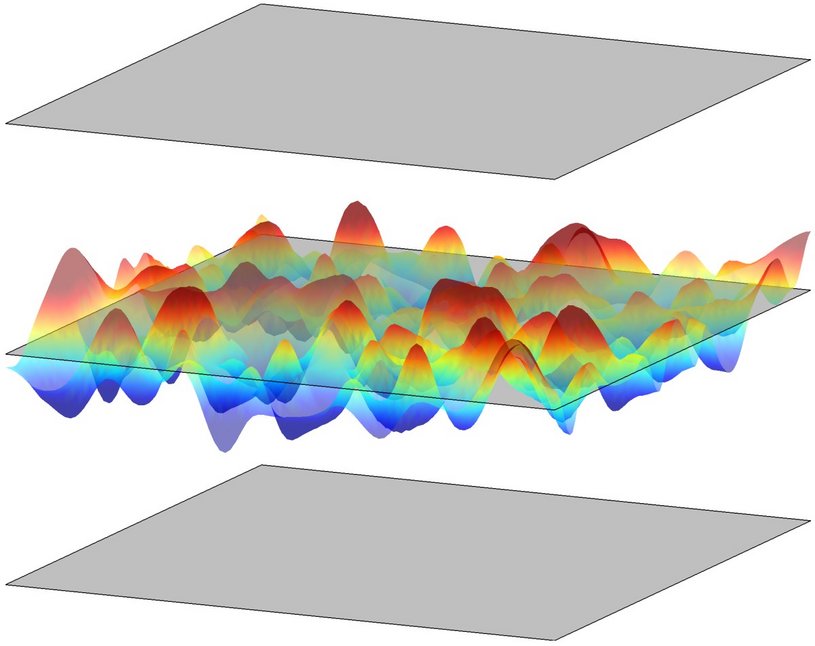
Vertical distance measurements are integrated to form a surface interpolant, simulated graphically in Fig. 8, which characterizes the geometric error at the top surface of the part. Local geometric error is corrected by adjusting the nominal flow rate separately at every point on every deposition path for subsequent layer(s). With this feedback system active, geometric error is maintained at approximately one centimetre, throughout part construction. This critical system feature greatly enhances the printing accuracy and also permits the use of printing materials that would otherwise be uncontrollable.
Part Construction
The part construction process is shown below for two objects: a statue of Sir Wilfrid Laurier and a Voronoi sphere. Three major steps are needed for each part: trajectory preparation, 3D printing, and support removal. The usable workspace of the cable-suspended mechanism is approximately cylindrically shaped, one metre high and one metre in diameter. The foam deposition path width and height are 12 mm and 10 mm, respectively.
Statue of Sir Wilfred Laurier
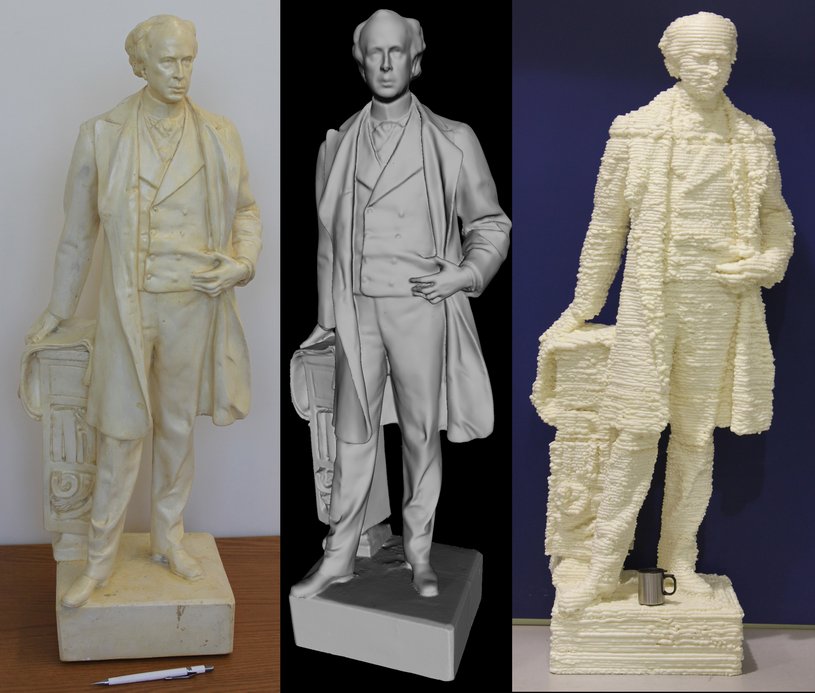
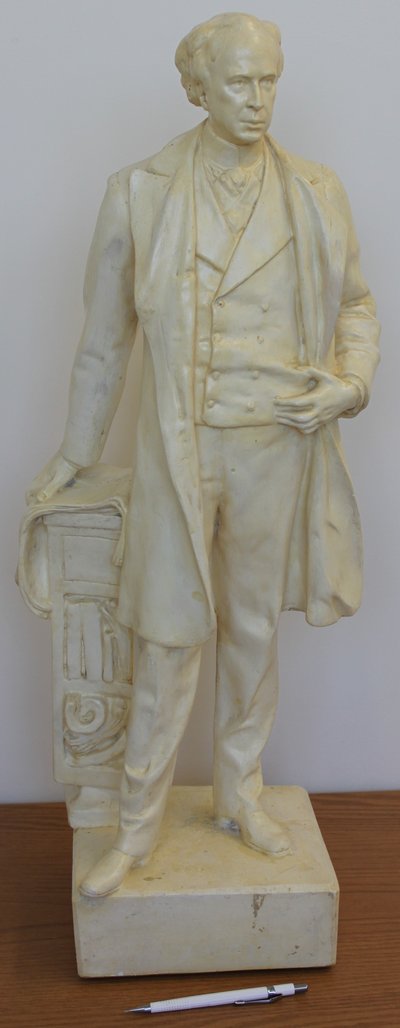
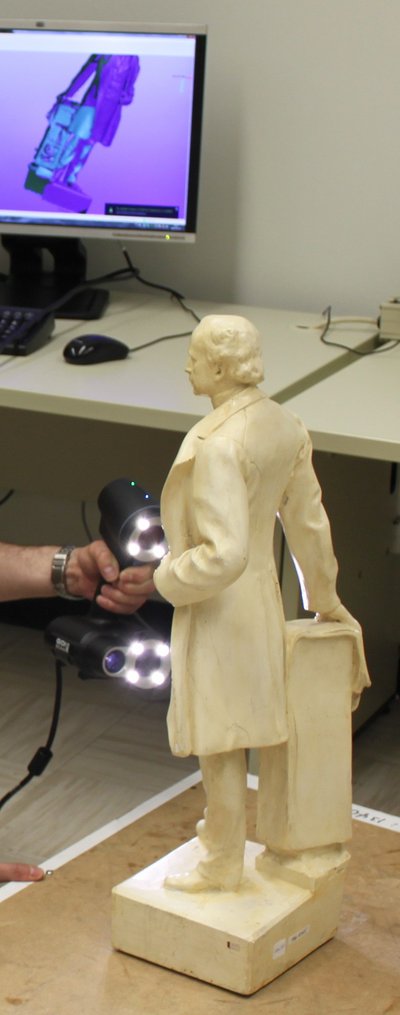
The plaster statuette of Sir Wilfrid Laurier, created by Louis-Philippe Hébert in 1898, shown in Fig. 10, was loaned by the Museum Collections of Objects and Specimens of Laval University. The statuette was 3D-scanned by The Computer Vision and Systems Laboratory of Laval University. A PLY part geometry file, containing about one million triangular faces, at a resolution of about 1 mm (for the 720-mm-high statuette), was created using the 3D-scan data. The PLY file format is similar to the STL format traditionally used in 3D printing, except it is more data-efficient and more versatile in terms of the geometric and part data that can be stored.
The plaster statuette, 0.72 m (2' 4") tall, was scaled up by a factor of three for printing, to produce a foam statue 2.16-m (7' 1") tall. Laurier himself was apparently over six feet tall, and the pedestal is 0.23-m (9") tall, so the printed scale is approximately life-size.
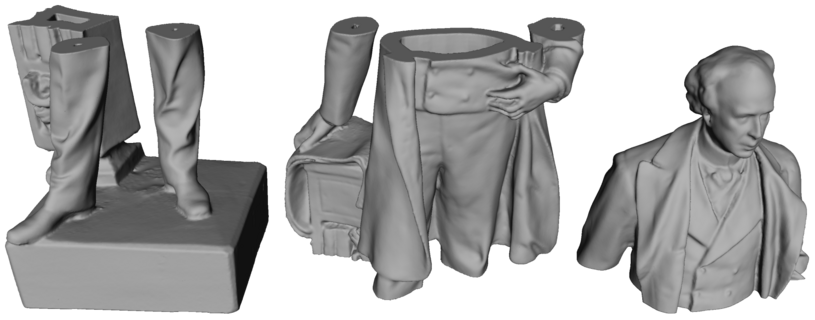
Since the desired statue height was larger than the usable printer workspace, it was printed in three separate sections, as shown in Fig. 9. This figure also shows that the computer model is hollowed out. This feature is added intentionally to reduce the polyurethane foam curing time–large pools of foam tend to cure slowly and also deform more after deposition.
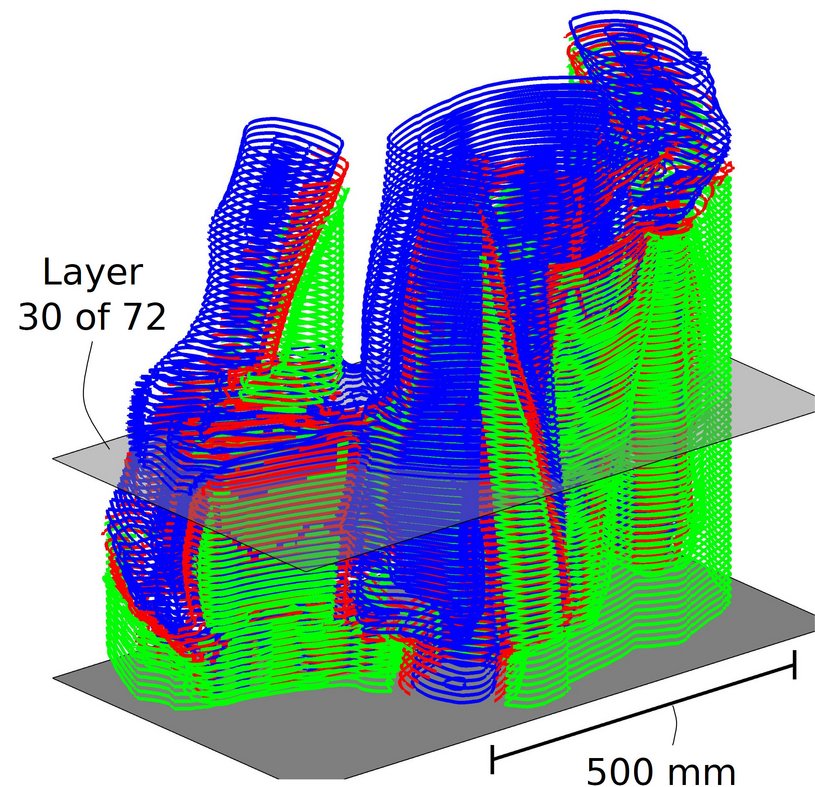
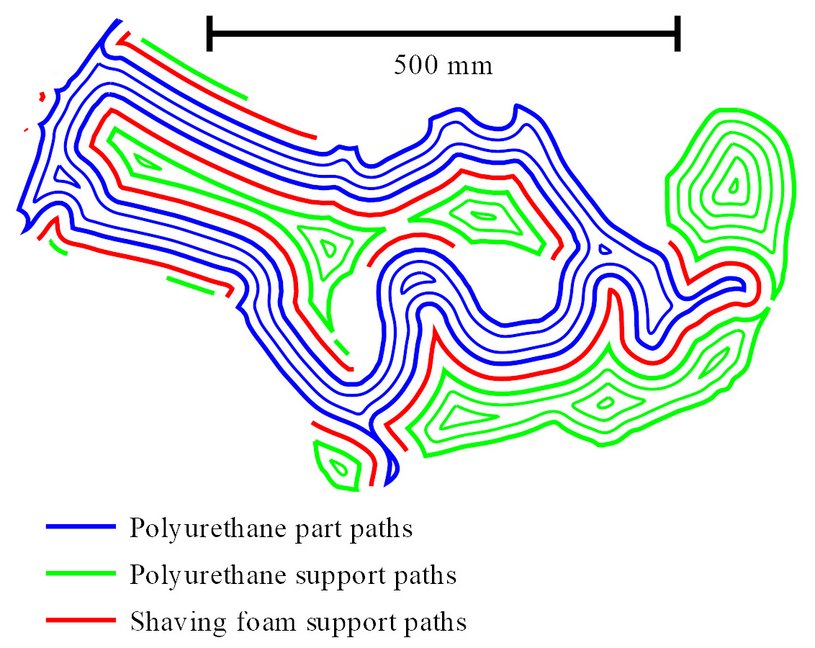
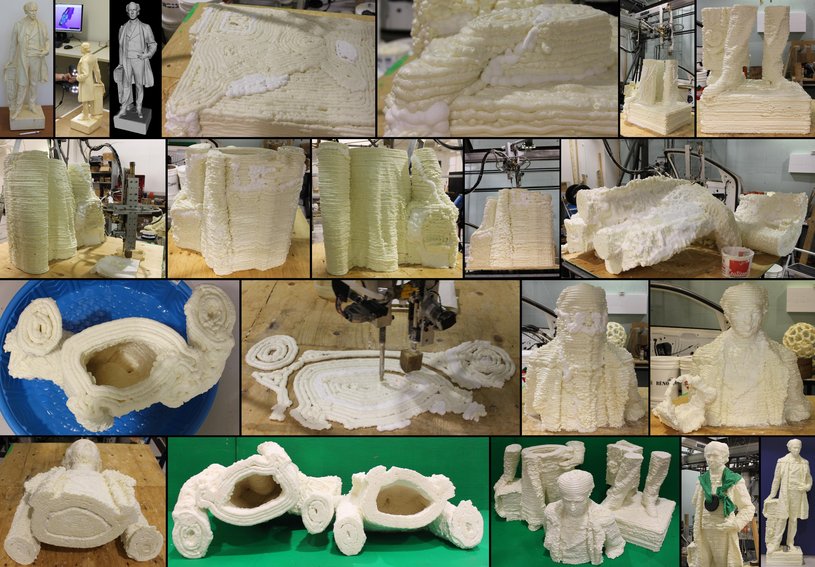
Once the 3D geometry file is finalized, the next step is to slice it into 2D layers and represent each layer by 1D deposition paths. This is accomplished using a Matlab algorithm, which takes a PLY or STL file as input and outputs path data as three-dimensional coordinates. Each section of the statue is sliced into 72 layers, for 216 layers in all. Figure 11 shows boundary path data for the middle section of the Laurier statue. This figure also illustrates the three-dimensional version of the film technique shown in Fig. 6. Fig. 12 shows deposition boundary and fill paths for layer 30 of the Laurier middle section.
Figure 13 is an animation which shows the deposition paths for all 216 layers of the Laurier statue, when it is constructed in three sections, which requires 298 L of material, including the part and support. Figure 14 shows the same animation, if the statue had been constructed as a single part, which would require 421 L of material. Although considerably more support material is needed to construct the model in a single piece, the final product would be more accurate and less manual work would be needed after 3D printing.
when it is constructed in three sections.
Path data indicate where material is to be deposited in 3D space, but contain no information about how fast the cable robot platform is to move. In other words, path data contain spatial information but no temporal information. Path data are transformed into trajectory data, equally-sampled in time, which respect these speed and acceleration constraints, using a time-optimal trajectory planning algorithm. Conservative constraints were imposed for this initial stage of printer development: a maximum speed of 0.1 m/s and a maximum acceleration of 0.3 m/s2. Figure 15 shows path speed data for the middle section of the Laurier statue, generated from the trajectory data provided to the robot controller.
As mentioned above, surface mapping feedback is a critical system feature, essential for maintaining geometric control during part construction. Figure 16 shows the measured error surfaces, according to laser distance measurements, for six layers of section 2 of the Laurier statue. Layer 0 shows the measurement of the deposition surface prior to construction. Based on this figure, we can conclude that part error remains well-controlled throughout construction.
The total printing time for the Laurier statue was approximately 38 hours. A few hours were required support removal and statue assembly. Figure 17 shows a series of images taken during the construction. Figure 18 displays a video which summarizes the construction process, including timelapse photography of the 3D printing and support removal.
Voronoi Sphere
Although the Laurier statue construction provides a good demonstration of the 3D foam printer, it is perhaps not the best object for highlighting the advantages of additive manufacturing, compared to material-removal manufacturing, where a part is machined by cutting away material from a block, using operations such as milling and drilling. Indeed, one could imagine creating the Laurier statue by starting with a large block of foam and executing a series of milling operations.
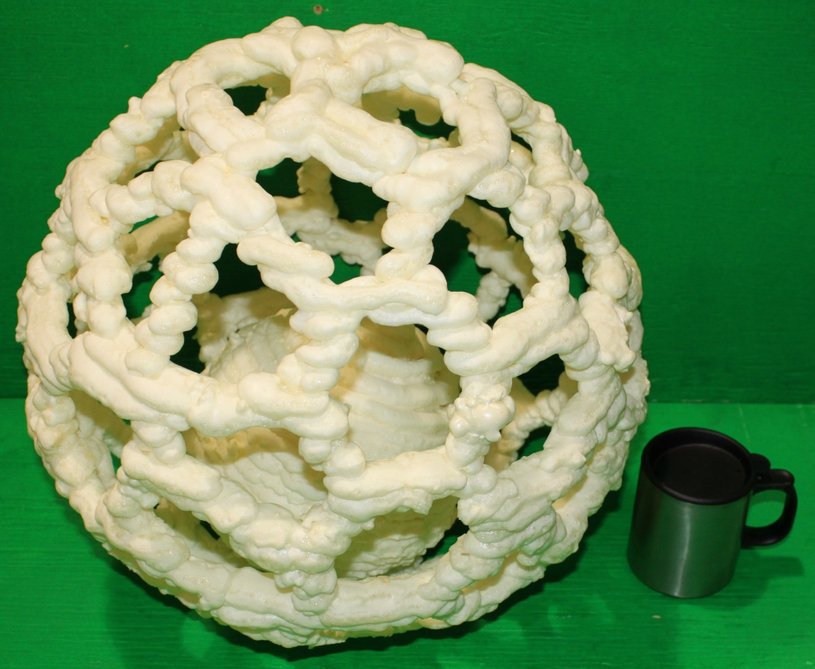
Therefore, to further demonstrate the capabilities of the 3D foam printer, the construction of a spherical cage containing a trapped solid sphere is shown below. This part, called a Voronoi sphere and shown in Fig. 19, was created using MeshLab, by following a procedure available on the MeshLab blog.
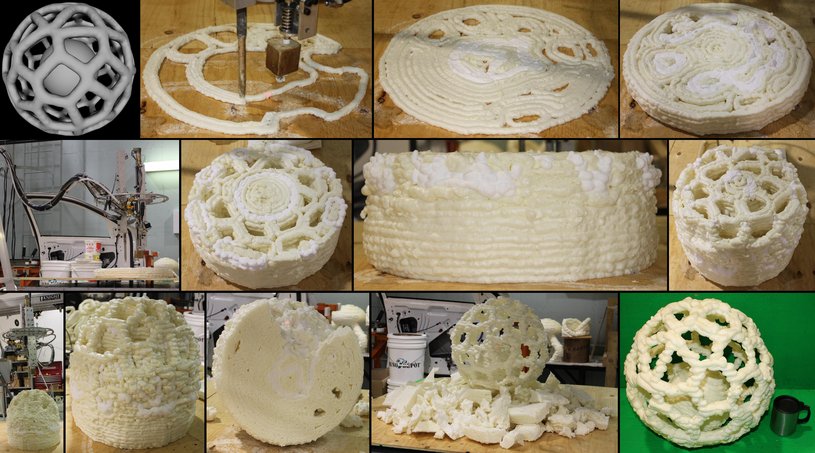
The paths and platform speeds for the Voronoi sphere are shown in Figs. 20 and 21, respectively. While planning the sphere construction, we had to decide which support technique was more appropriate for the part: the shell or the film technique, both of which are shown in Fig. 6. As mentioned above, the film technique is preferable if it is feasible, because much less material is required. Figure 20 shows the deposition paths that are produced when slicing the sphere using the film technique. Upon watching this animation, we see that the polyurethane support appears to be hopelessly interlocked with the polyurethane part.
However, support removal is potentially feasible when we consider that polyurethane foam is elastically deformable to a certain extent, and can be manually trimmed relatively easily. Armed with this knowledge, we proceeded with the Voronoi sphere construction, using the film technique. We assumed that we would be able to cut up the polyurethane support following construction and extract it through the holes in the spherical cage. The sphere was scaled to have a 40-cm diameter, requiring 40 printed layers, which were built in about six hours. Support removal was successful, requiring about one hour. Figure 22 shows the completed sphere, Fig. 23 shows a series of images taken during the construction process, and Fig. 24 is a video which summarizes the construction, including timelapse photography of the 3D printing and the [entertaining] support removal.
Conclusion
The successful construction of the Laurier statue and Voronoi sphere demonstrates the feasibility of using of a cable-suspended robot for 3D printing. Future work with the printer will involve enlarging the workspace and improving its accuracy, robustness, and speed. Additionally, we plan to adapt the system to print other materials, such as concrete.
Publications
E. Barnett and C. Gosselin, 2015, Time-Optimal Trajectory Planning of Cable-Driven Parallel Mechanisms for Fully Specified Paths With G1-Discontinuities, ASME Journal of Dynamic Systems, Measurement, and Control 137 (7), July 2015, 12 pages, http://dx.doi.org/10.1115/1.4029769
E. Barnett and C. Gosselin, 2015, Large-Scale 3D Printing With A Cable-Suspended Robot, Additive Manufacturing, in press, http://dx.doi.org/10.1016/j.addma.2015.05.001
E. Barnett and C. Gosselin, 2015, Weak Support Material Techniques For Alternative Additive Manufacturing Materials, Additive Manufacturing, in press, http://dx.doi.org/10.1016/j.addma.2015.06.002
Project contacts
Dr. Eric Barnett
Chercheur postdoctoral, Laboratoire de robotique
Département de génie mécanique, Université Laval
Email: ericDOTbarnettDOT1ATulavalDOTca
Professeur Clément Gosselin
Directeur, Laboratoire de robotique
Département de génie mécanique, Université Laval
Email: gosselinATgmcDOTulavalDOTca
Acknowledgements
We gratefully acknowledge the support of The Social Sciences and Humanities Research Council of Canada (SSHRC), under Strategic Research Grant 890-2011-0039. This work was also supported by le Fonds de Recherche du Québec -- Nature et Technologies (FRQ-NT) , in the form of a postdoctoral fellowship for E. Barnett. We thank the Museum Collections of Objects and Specimens of Laval University for providing the plaster statuette of Sir Wilfrid Laurier, and The Computer Vision and Systems Laboratory of Laval University for 3D scanning the statuette. Thanks to Honeywell Refrigerants for providing us with a sample of blowing agent for the development of the shaving foam support material.
Performalism
As mentioned above in the Acknowledgements section, the 3D foam printer development is part of a larger research project supported by SSHRC, under Strategic Research Grant 890-2011-0039, entitled, "Performalism - Form and Performance in Computational Architecture and Fabrication". With Performalism we propose a new approach to architectural design and fabrication. The project showcases the integration of multidisciplinary knowledge and partnership among experts in engineering and architecture. The research partnership stands at the crossing of design conception, digital manufacturing and engineering investigation. Performalism is an innovative paradigm aimed at creating an automated robot-driven fabrication technology capable of producing large-scale architectural prototypes.
Performalism Team
Principal Investigator
Professor Aaron Sprecher
Director, Laboratory for Integrated Prototyping
and Hybrid Environments (LIPHE)
School of Architecture, McGill University
Co-Investigator
Professor Jorge Angeles
Director, Robotic Mechanical Systems Laboratory
Department of Mechanical Engineering and
Centre for Intelligent Machines (CIM),
McGill University
Co-Investigator
Professor Clément Gosselin
Director, Robotics Laboratory
Département de génie mécanique, Université Laval
Collaborator
Professor Damiano Pasini
Director, Pasini Lab
Department of Mechanical Engineering,
McGill Institute for Aerospace Engineering , and
McGill Institute for Advanced Materials , McGill University
Collaborator
Retired Professor Pieter Sijpkes
Director, Ice Laboratory
School of Architecture, McGill University
Related work
Additive Manufacturing (3D Printing) With Ice
The New Architecture of Phase Change Computer-Assisted Ice Construction, website, School of Architecture, McGill University.
E. Barnett, 2012, The design of an integrated system for rapid prototyping with ice, Ph.D. thesis, Department of Mechanical Engineering, McGill University.
E. Barnett, J. Angeles, D. Pasini, P. Sijpkes, 2011, Surface mapping feedback for robot-assisted rapid prototyping, Proceedings of the IEEE International Conference on Robotics and Automation, Shanghai, China, pp. 3739–3744.
E. Barnett, J. Angeles, D. Pasini, P. Sijpkes, 2010, A heuristic algorithm for slicing in the rapid freeze prototyping of sculptured bodies, in: J. Angeles, B. Boulet, J. J. Clark, J. Kovecses, K. Siddiqi (Eds.), Brain, Body, and Machine, Springer-Verlag, Berlin, pp. 149–162.
E. Barnett, J. Angeles, D. Pasini, and P. Sijpkes, 2009, Robot-assisted rapid prototyping for ice structures, Proceedings of the IEEE International Conference on Robotics and Automation, Kobe, JP, May 12–17, pp. 146–151.
Cable-Driven Parallel Mechanisms
C. Gosselin, S. Bouchard, 2010, A gravity-powered mechanism for extending the workspace of a cable-driven parallel mechanism: Application to the appearance modelling of objects, International Journal of Automation Technology 4 (4) pp. 372–379.
J.-D. Deschênes, P. Lambert, S. Perreault, N. Martel-Brisson, N. Zoso, A. Zaccarin, P. Hébert, S. Bouchard, C. Gosselin, 2007, A cable-driven parallel mechanism for capturing object appearance from multiple viewpoints, Proceedings of the 6th International Conference on 3-D Digital Imaging and Modeling, Montreal, Canada, pp. 367–374.

